If you read further, you will find the guidelines for the time needed to smooth your floor. Do not underestimate how much time you need to sand a floor. This seems obvious, but it takes more time to sand your floor the larger your room is and the more space you have.
Sanding floors in older homes, floors damaged by water, or floors in damp environments can take more time. Uneven wood floors require quite a bit of time for floor sanding and polishing, because a deep grind is required on a floor to achieve a level surface. However, sanding a wooden floor is often necessary in order to achieve and keep the best look for a wood floor.
Sanding and polishing wood floors is the best way to keep them looking their best.
Refinishing your hardwood floors involves sanding down the top layers of finish to remove old finishes as well as any scratches, dents, or slight discoloration. Whitewashing hardwood floors costs $2-7 a square foot, and requires that you sand down to remove the old finish, and then apply a lighter-weight finish and a clear polyurethane finish, rather than dark stain. It takes between 2 to 6 days for refinishing hardwood floors, depending on the home size, layup, type of finish, and the stain chosen. Refinishing hardwood floors using an oil-based polyurethane typically takes 3-5 days (including drying).
Refinishing floors that have a prior finish takes more time than grinding down hardwood that has not been finished. When you are sanding and refinishing hardwood floors on your own, it can be much harder to estimate just how much time you will need.
It is rare for a sanding and refinishing floor work (as opposed to installing a floor, or staining) to take longer than 5 days. Wood floor treatment may take longer too, depending on wood species and style of flooring (parquet floors).
Floor sanding and polishing usually takes three days, from start to finish. Professional sanding and polishing floors usually takes less time. For example, it will take three days for a professional sanding floor professional to finish the sanding and polishing on a typical three-bedroom home that has well-maintained floors. All these factors may add time to a floor sanding, but professional floor sanding and polishing is cheaper, easier, and takes comparatively less time than replacing a floor.
Without frequent sanding and polishing, divots, scratches, and dent marks build up, and the finish gradually wears off, shortening your floors lifespan. If you are sanding an older floor that has seen lots of traffic, you might find there is much more finish accumulation at the edges, so be prepared to go to the coarsest sandpaper grades with the finisher.
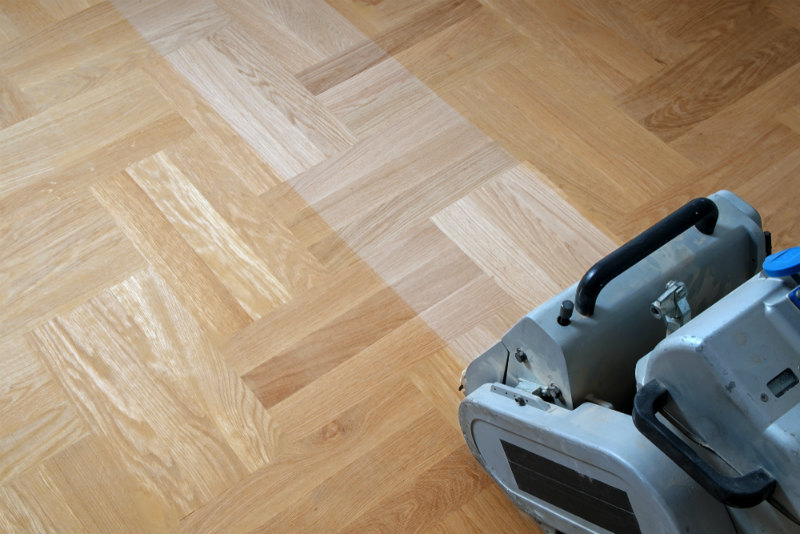
Move up to a medium-grade sandpaper for more polishing before applying your topcoat, and for the harder-to-reach edges your basic floor sander cannot get, use a special tool called a floor edging sander. If you are sanding a major portion of the floor with the main sander, then an edge sander is likely needed to get at edges closer to walls. You will have to sand the edges around the room using the edge sander, while you sand the rest of your floor using a larger drum sander.
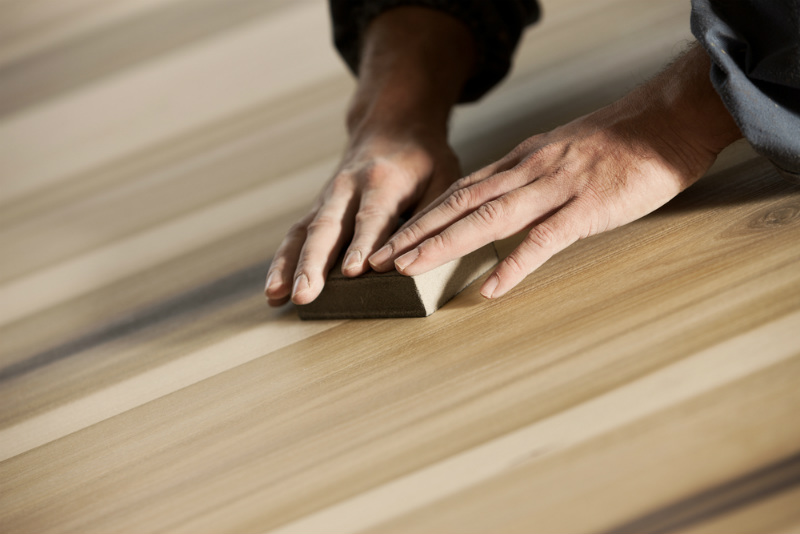
You can leave the floor as-is, but you would need to smooth out the divots with a hand sander. You are likely going to be using the detailing sander to finish the corners in your room, so if you are tempted to see if sanding floors with a hand sander is feasible, give it a shot in the corner where you are going to be using the detailing sander anyway. If your floorboards are truly uneven, or painted in one heavy coat, it is probably best to begin sanding floors using 16-grit paper.
Hardwood floors should not look rough after being refinished, as long as a contractor has finished sanding your floors in three passes using appropriate sandpaper grits, polished your floors, and added at least two coats of finish.
After sanding the floor (and cleaning up any wood dust), the finish is applied to help protect it and to impart beautiful color or gloss to the timber. After the sanding, contractors can add stain to alter the colour of the wood, and then a clear finish is applied to seal and protect the floor. If this is done, sanding creates stippling marks in the floor, which are noticeable once you shine down the center of the floor, and also creates depressions in the wood. Starting from coarse sandpaper, the floor sander will be used to smooth out existing finishes, coatings, stainings, and finishes of your floors.
To perform sanding, the most essential tool that will be required is the floor sander, which you can hire from us at Floor Sander Hire London, and it will remain in your possession until you are done. Floor Polishing is a simple DIY project which will restore a wooden shine without the need for sanding, however it will not eliminate scratches or discolouration. Some engineered floors are suitable for sanding and refinishing, but not all are: in general, it takes several feet of laminate flooring to go through before a floor can be considered for sanding and refinishing, perhaps trying in an under-the-sealed area first, such as the inside of the base of the cupboard. The process is the same every time – clear out your room, check that floorboards are not damaged and that your floor is secure and secure, sand the main floor of your room using drum sanders, use edge sanders on the outside edges of your room, and once finished, you will clean it up and reglaze, oil, or paint.